

Lightning for Events Management
Lightning-enabled orgs have access to a dedicated experience on the Browser (Lightning) platform, enabling the use of Salesforce’s enhanced Lightning UI with the capabilities of Events Management.
Once configured, the Lightning UI applies to the following Events Management functionality:
- Creating and Editing an Event – See Functionality Differences for updated functionality
- The Next Steps Section – See Functionality Differences for updated functionality
- Adding Event Team Members
- Adding Event Budgets to an Event
- Adding Speakers to an Event – See Functionality Differences for updated functionality
- Adding Event Materials to an Event
- Entering Expense Estimates into an Event
- Event Sessions
- Adding Attendees to an Event
- Searching for Out of Territory Attendees – See Functionality Differences for updated functionality
- Adding Walk-in Attendees – See Functionality Differences for updated functionality
- Reconciling Walk-in Attendees – See Functionality Differences for updated functionality
- Entering Expense Headers and Lines
- Using the Files, Attachments, and Notes related list in EM_Event_vod records
- Managing Related Lists in Lightning for Events Management
- Selecting Attendees in Hierarchies
- Adding Local Time and Time Zone to an Event
- Hosting a Virtual Event using Engage
- Generating Virtual Participant URLs in Child Events
- Alternative Hosts for Virtual Events
- Associating an Account with an Event
- Using Event Templates in Child Events
- SAP Concur Integration with Events Management
- Event Business Rules
- Event Tasks
- Using Notes in Lightning Experience
- Child Accounts in Events Management
- Searching for Child Account Attendees Outside a User’s Territory
- Viewing Expense Headers and Expense Lines in Lightning for Events Management
- Creating and Editing Expense Headers and Expense Lines – Includes creating split expenses
When defined on EM_Event_Layout_vod records, the following buttons display on events in Lightning for Events Management, enabling the following functionality:
These features are functionally equivalent to other platforms.
Unsupported Features on Lightning for Events Management
The following Events Management features are not currently available when using Lightning for Events Management, though support is planned in future releases:
Configuring Events Management for Lightning
- Grant end users access to the Run Flows App Permission.
-
Add the veevaEMModalLauncher component to any customer-created Lightning Record Pages of the following objects:
- EM_Event_vod
- EM_Attendee_vod
- EM_Event_Budget_vod
- EM_Event_Material_vod
- EM_Event_Session_Attendee_vod
- EM_Event_Session_vod
- EM_Event_Speaker_vod
- EM_Event_Team_Member_vod
- EM_Expense_Estimate_vod
- Expense_Header_vod
- Expense_Line_vod
Do not add this component to the same Lightning Record Page more than once.
Additionally, configuring this functionality involves overriding the New, Edit, and View buttons for the all of the following objects:
- EM_Event_vod
- EM_Event_Speaker_vod
- EM_Event_Budget_vod
- EM_Event_Team_Member_vod
- EM_Event_Material_vod
- EM_Expense_Estimate_vod
- EM_Attendee_vod
- Expense_Header_vod
- Expense_Line_vod
the customer should also set the Visualforce Page Override for the New button on the EM_Event_vod object to be EM_Event_Redirect_RT_Selector_vod if they plan on also creating events in Salesforce classic
Overriding the New and Edit Buttons
To override the New and Edit buttons:
- Navigate to the Buttons, Links, and Actions page on the appropriate object.
- Select either New or Edit from the drop down menu in the appropriate button row.
-
Select the EM_Event_Redirect_RT_Selector_vod Visualforce page in the Salesforce Classic Override section. This step only applies to the New button on the EM_Event_vod object.
When overriding the New button on the EM_Event_vod object, admins must also select the Skip record type selection page check box.
-
Select the appropriate Lightning component in the Lightning Experience Override section based on the object and button:
Object New Button Edit Button - EM_Event_vod
c:emEventNewOverride c:veevaActionEdit - EM_Event_Speaker_vod
- EM_Event_Budget_vod
- EM_Event_Team_Member_vod
- EM_Event_Material_vod
- EM_Expense_Estimate_vod
- EM_Attendee_vod
- Expense_Header_vod
- Expense_Line_vod
c:veevaActionNew - Select Save.
Overriding the View Button
The process for overriding the View button differs from overriding New and Edit, since admins must set the Lightning page layout as the org wide default:
- Navigate to the Lightning Record Pages page on the appropriate object.
- Edit the only existing record page.
- Select Save without making any changes to the page.
- Select Make Page Org Default.
Functionality Differences
The flow of supported Events Management functionality is unchanged from the Browser (Classic) version of the module, with the following exceptions.
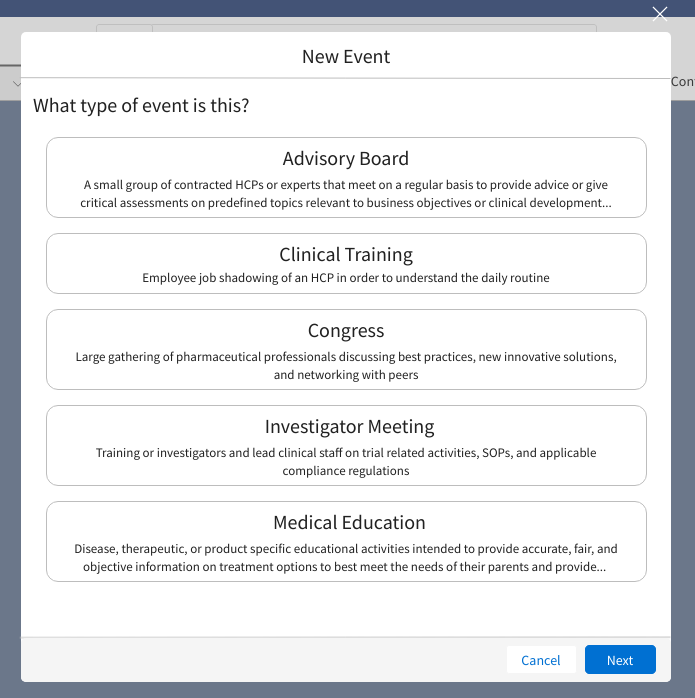
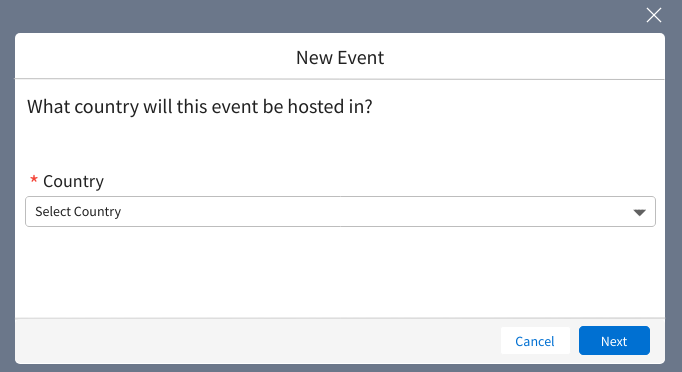
Creating Events in Lightning for Events Management
When creating an event, the record type selection page is overridden with a customized event creation flow including details for each defined event type, as well as country selection.
To enable organizers to begin planning events without knowing start and end times, the Start_Time_vod and End_Time_vod fields do not need to be populated initially to create the record.

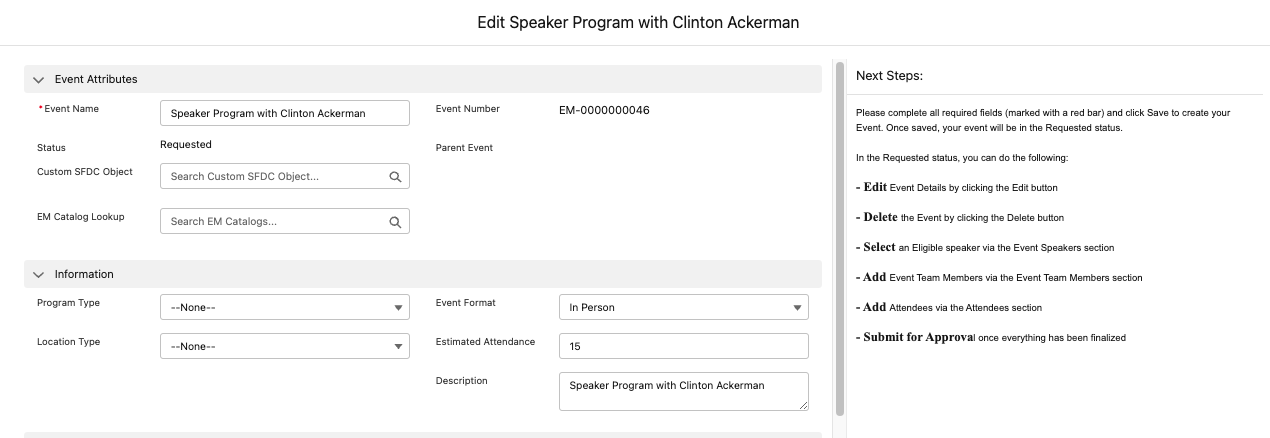
Viewing the Next Steps Section
The Next Steps section displays on EM_Event_vod records as a column to the right of the record’s details that users can expand or collapse by selecting the Expand or Collapse arrow button in the column header.
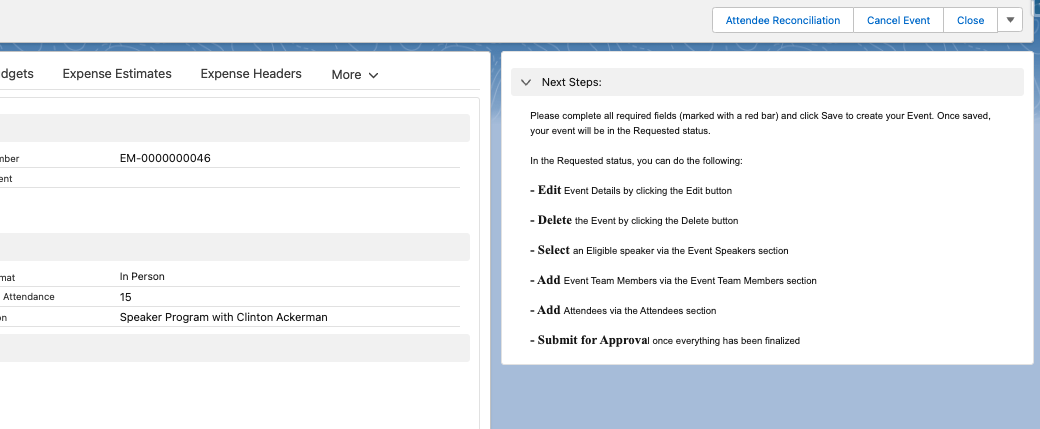
The Next Steps section also displays when creating or editing an EM_Event_vod record.
Adding Speakers in Lightning for Events Management
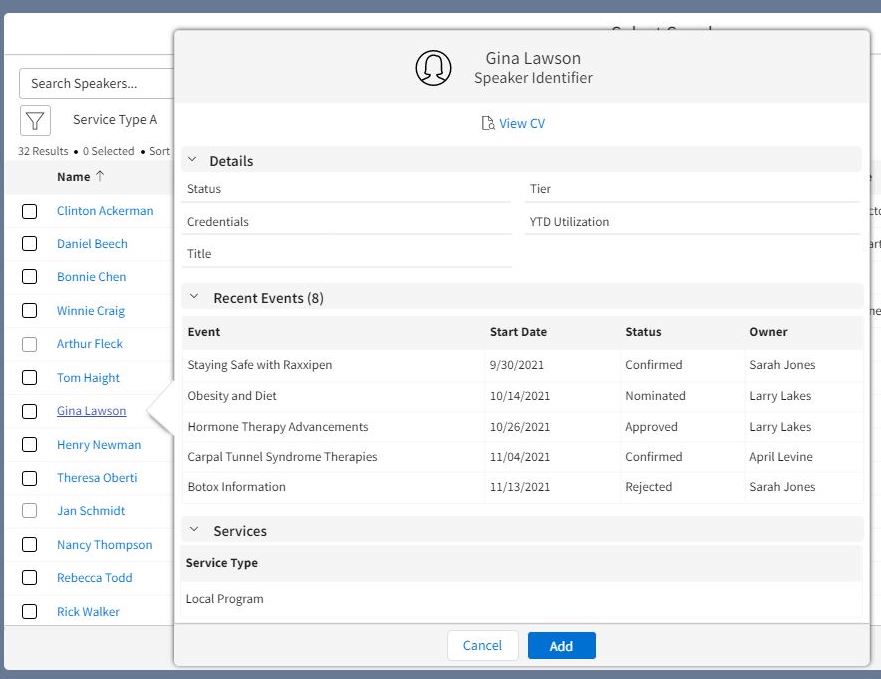
When adding speakers to an event, the Select Speaker displays as a modal over the event, rather than as a separate page.
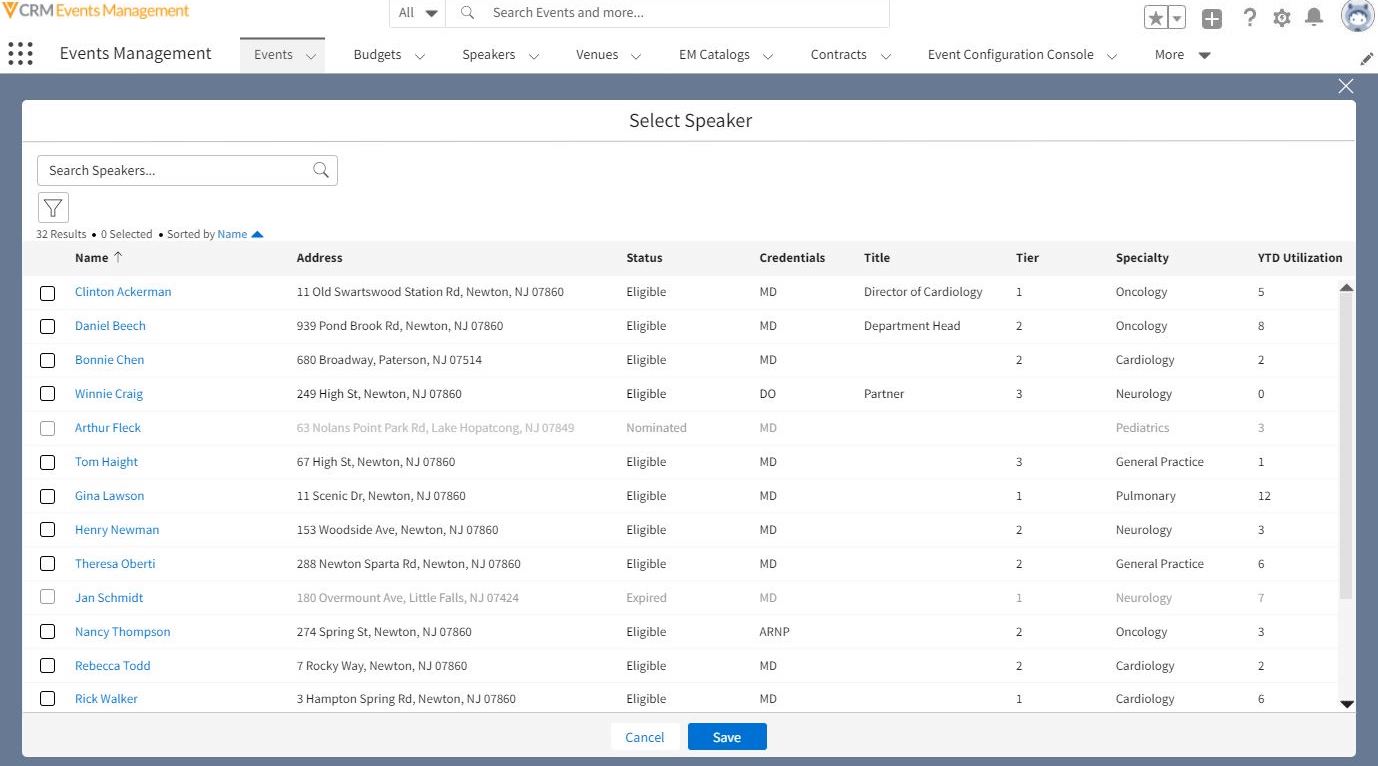
Selecting a speaker’s name in this modal displays details about the speaker, along with the option to add them to an event and download their CV file, if available.
In addition to adding speakers one at a time, users can also select multiple speakers to add at once using the check box column before selecting Save.
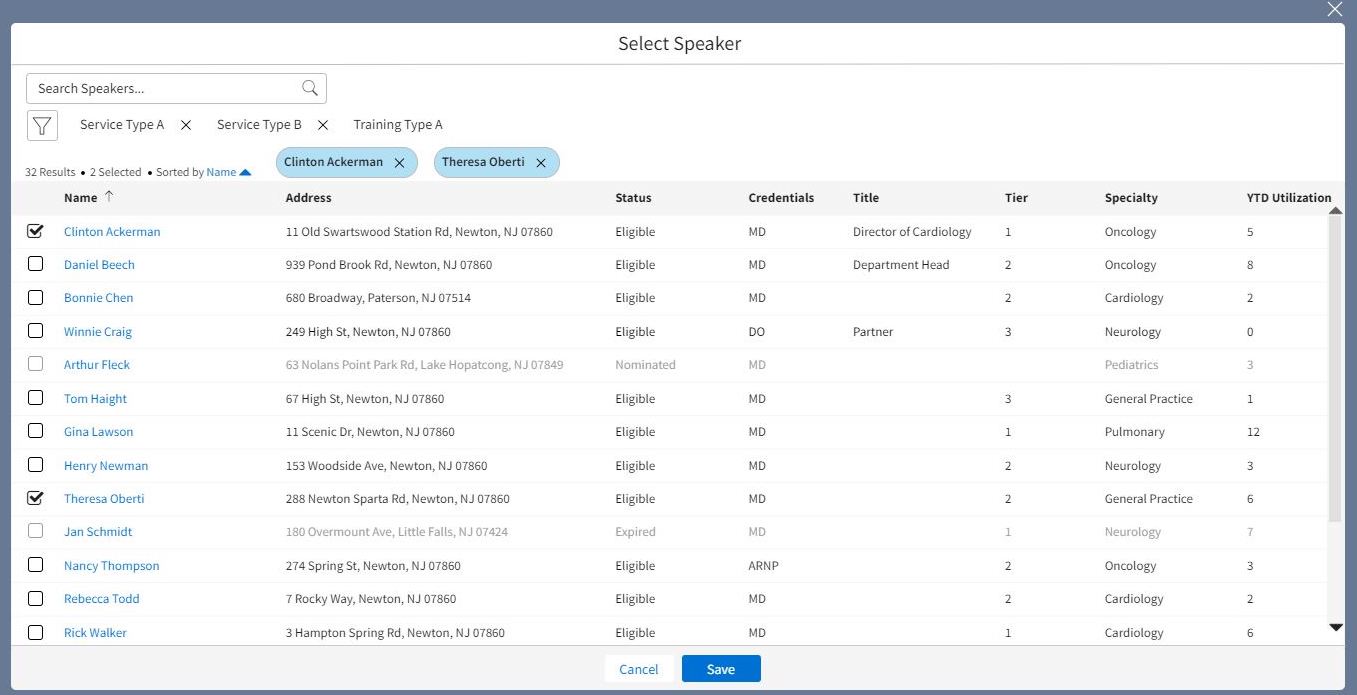
Searching for speakers searches across all fields that have been configured as Speaker fields.
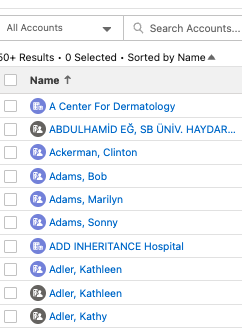
Managing Out of Territory Attendees
Organizers can search for out of territory attendees from the Select Attendees modal by enabling the Include Outside Territory toggle.
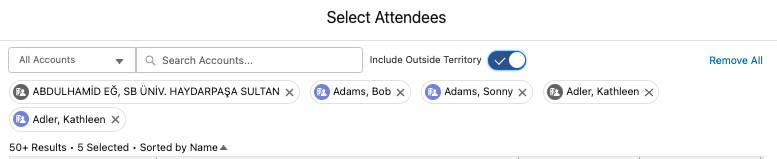
Out of territory accounts display as gray icons in the search results.
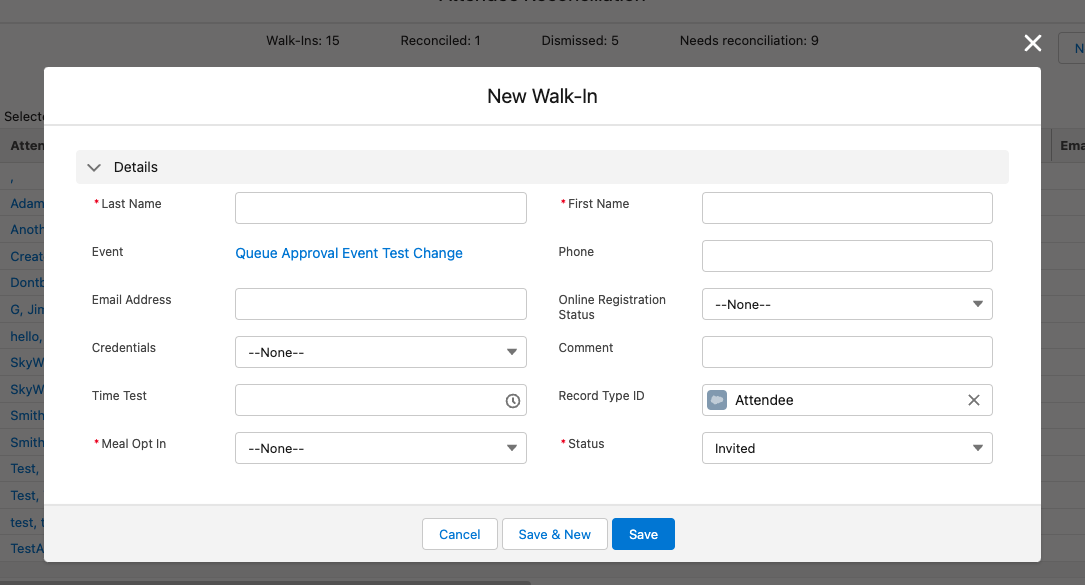
Adding Walk-in Attendees
Event organizers can add walk-in attendees by selecting the New Walk-in button in top right corner of the Attendee Reconciliation modal.

This displays the New Walk-in modal, which organizers can use to enter details about the walk-in attendee.
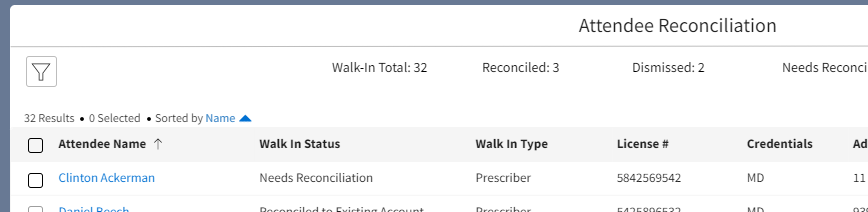
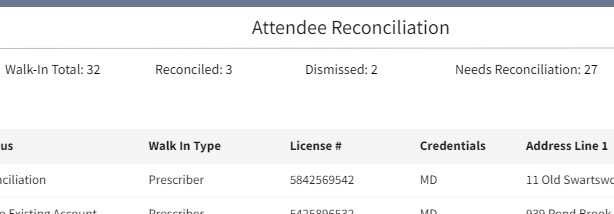
Reconciling Walk-in Attendees
The functionality flow for reconciling walk-in attendees is unchanged, with the following exceptions.
The Attendee Reconciliation modal displays a table containing all of the event’s walk-in attendees. This table includes the following columns:
- Attendee_Name_vod
- Walk_In_Status_vod
- Walk_In_Type_vod
- Any additional fields configured for the walk-in type
Organizers can select the Filter button to filter the table by walk-in status or walk-in type.
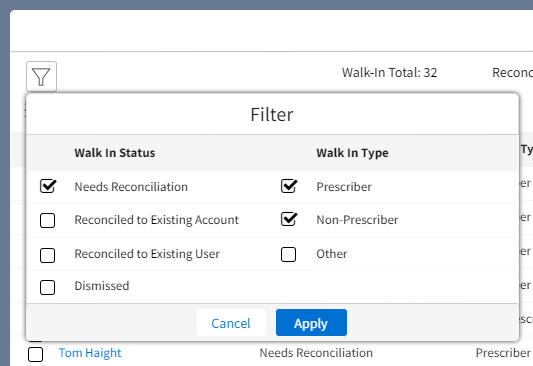
A warning displays if the list of walk-in attendees exceeds 2000 records. Organizers are prompted to filter the table in order to display all appropriate attendees.
Additionally, totals for each walk-in attendee status display in the modal’s header, enabling organizers to quickly know how many attendees need to be reconciled.
Organizers can select multiple attendees to reconcile at once by selecting the appropriate check boxes in the left column, then selecting the Search for Matches button.
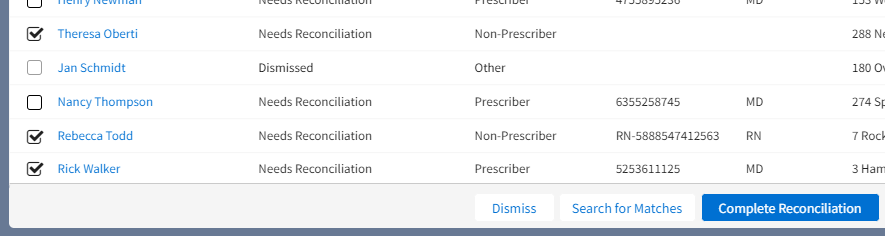
If the organizer selected multiple attendees to reconcile at once, the Next and Previous buttons display on the Search for Matches modal, along with the total number of attendees selected. This enables organizers to navigate between all of the selected attendees.

